 Our Meetup.com gang was on the bridge during our recent trip to NYC, ready to head back to Manhattan, when we suddenly found ourselves swimming against a happy tide.
This throng is part of the kickup of this year's NYC United Way campaign.
Our Meetup.com gang was on the bridge during our recent trip to NYC, ready to head back to Manhattan, when we suddenly found ourselves swimming against a happy tide. The corner of Harborplace formed by the two main pavilions is a hangout for these dabbling ducks. They're always looking for a handout from us humans, and they're worth it, as they provide a lot of free entertainment.
  How many times can I photograph the same building? A lot, if it's a good one, like 250 W Pratt. Since it's caddy-corner to my Light Rail stop, I go past it twice a day every workday.
  If you're a long-time Baltimorean, you remember the original Double-T Diner in Catonsville. Founded by the eponymous Thomas Doxanas and his partner Tony, Double-T always was the place to go for good food, plenty of it, 24 hours a day.
  You can have your own photos printed on just about anything these days - mugs, cakes, beachballs... why not postage stamps?
 As I began to use my Leica IIIc alongside my Nikon F during the middle '70's, I started to wonder about a more compact SLR. Here again, my friend Rich Schnabolk, the former Kowa owner, influenced me. Rich had started using an Olympus OM-1, and I was very impressed with how compact it was.
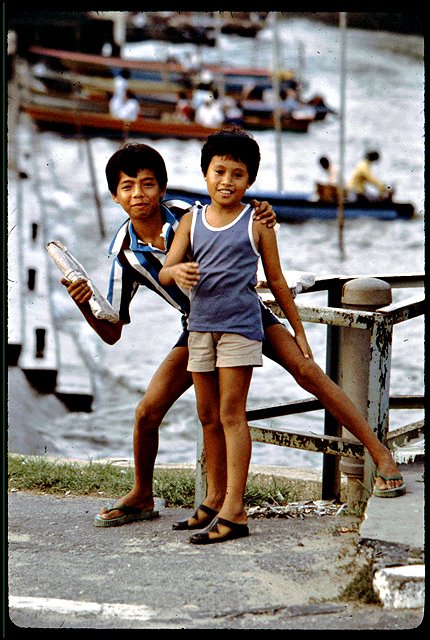 Though smaller than any other SLR at the time, the OM-1 was full-featured and even a "system" camera - with a full range of lenses and accessories available. The little camera had a very solid feel, and surprisingly, a brighter and larger-appearing viewfinder than contemporary cameras.
 In my job at GE in those years, I travelled extensively overseas, and the little OM-1 outfit proved to be a good fit for travelling and travel photography. The kit came with me on trips to Frankfurt, Zurich, Milan, Paris, Jeddah, and of course, Rome.
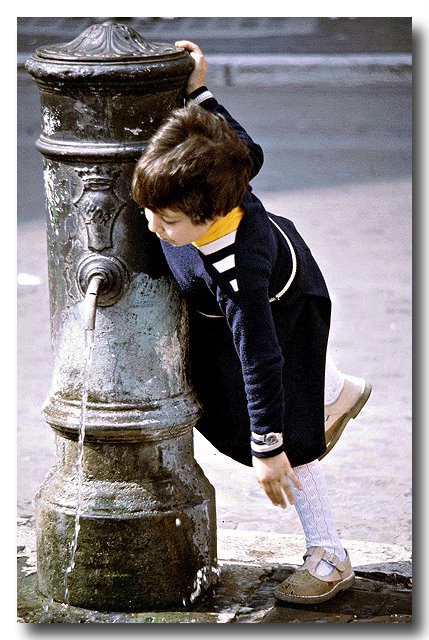 Breeze? In December? Before I even looked at the window, I shot a glance to the corner of the room where I always left my camera bag... and it was gone!
Photos from our Manhattan Meetup last Saturday.
 |  |
| Woolworth Building | Green Spiral Benches |
 |  |
| Cyber Cigar Coffee Bar - Too Many Good Things in One Place! | Brooklyn Bridge Facing East - 9AM |
 |  |
| Helen McAllister - South Street Seaport | Brooklyn-Bound Taxi |
 In a previous Tech Tuesday post, I showed you how to add a lot of snap to your photos by color-correcting them using the darkest black and whitest white points in your image.
 You need to make sure your Layers palette is showing. If it isn't, click on the Windows menu item and choose Layers. Now click on the little divided circle near the top of the palette to drop down the menu, and select Threshold.
 Now you'll see that your photo shows up in very high-contrast black and white, with a Threshold dialog floating above it.
 Now that you know the blackest and whitest points in your image, click Cancel on the Threshold dialog, and use press CTL-L to bring up the Levels dialog.
 Our meetup.com group had a great trip to Manhattan this past Saturday. Our bus dropped us off on East Broadway, just under the Manhattan Bridge, and from there, we walked to Foley Square, then traversed the Brooklyn Bridge. After some more shooting at South Street Seaport, we subwayed up to West 86th Street and entered Central Park, walking all the way down to Grand Army Plaza.

 In this first photo, Grate Expectations No. 2, I was shooting some colorful autumn leaves on an aluminum grating when I accidentally moved the camera during the exposure. "Hmmmmm... that's interesting!" was my reaction a second later when the swoosh of color showed up on the little display. I took about 30 more exposures, moving my camera this way and that, trying to get different effects. This is one of the two that I think came out well.
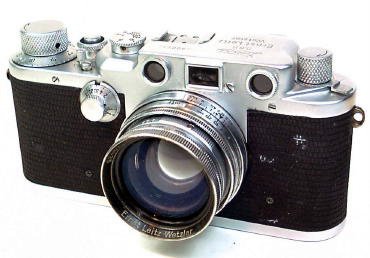
 That Leica, when I bought it, was already 33 years old, but it was a thing of beauty. Compared to my Nikon, especially with its heavy and clunky Photomic T finder, it was a featherweight, and a pleasure to carry around. For some reason, compared to an SLR, the rangefinder mechanism and all the fine knurling on the various knobs gave it a feeling of watch-like precision. It may be a guy thing, but I found myself often picking it up at odd times and playing with it - not shooting pictures, just looking through the viewfinder and rangefinder (two separate windows in the old screw-mount Leicas!) and focusing it, and dry-firing it.
 The Serenar was a really excellent lens, but I had really wanted a Leica lens so as to be more "authentic." A year after buying the camera, I purchased a near-mint collapsible Summicron 50mm f/2.0. I wasn't disappointed, as this turned out the be the best lens I've ever owned prior to the digital age. Besides its amazing optical performance, it was also a better physical match for the small camera than the heavy Serenar. With the Summicron collapsed, I could slip the whole package into a coat pocket.
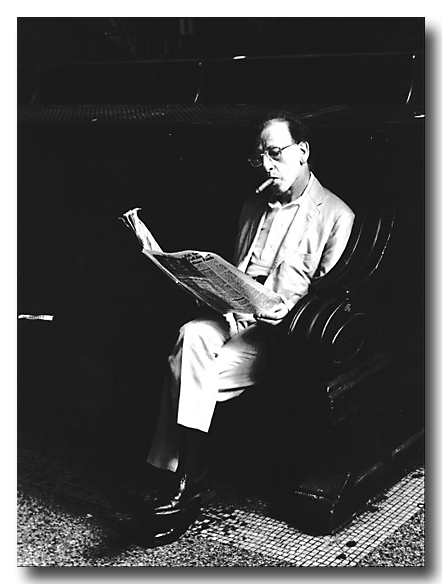
 And here's one to show that I'm not afraid to get right up close to a subject and look him in the face! Check out the classic mid-'70's painted t-shirt and slightly pre-disco hairdo. This shot taken on Madison Ave in NYC, August 1974.
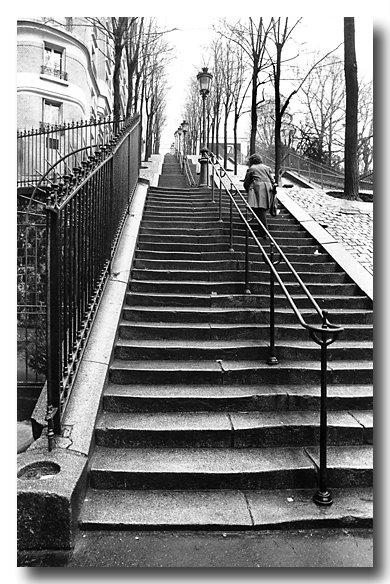 Rue Foyatier, this oft-photographed stairs, climbs up the Butte Montmartre in Paris, ending near Sacre Couer basillica, the highest point in the city. It was a soggy, overcast day, and I wanted a somber, lonely look. I waited with my Leica IIIc and this solitary lady obliged me by starting the long climb upward. December 23, 1977.
But this one song, Imagine, bugs me. And it bugs me that many people think of this song when they think of Lennon, despite the fact that he wrote so many other songs, great songs.
It's not the music, which is pretty enough, but the words that bother me. The ideas in those words.
No religion. No countries. Nothing to live or die for. Yeah, we've seen that before. It was called the Soviet Union. We see it now in "Old Europe." And we continue to see it in the politically and socially dysfunctional petty tyrannies of the Middle East.
In an insightful Wall Street Journal opinion piece last June, Bret Stephens expresses former Prisoner of Conscience Natan Sharansky's take on the Imagine concept:
| Mr. Sharansky's argument is that man's quest for identity – for the human and communal particulars that set him apart from others – cannot be separated from his quest for freedom – the universal set of values to which he and everyone else lay an equal claim. He argues that a freedom that "does not include the freedom to be significantly different" is no freedom at all. And he believes that while a politics that expresses itself purely through identity is bound to be tyrannical, a democracy that ignores its own identity – or attempts to suppress the various identities within it – betrays its deepest principles and puts its long-term survival at risk. |
John Lennon and Yoko Ono created conceptual country, Nutopia, a notional nation that was founded on the principles of the song, Imagine. That was there solution.
But as John himself wrote, "You say you got a real solution, well, we'd all love to see the plan."
Ok, my Grinch-like detour to politics and philosophy is over, now back to photography. I took the photo above this past weekend in the section of New York's Central Park called Strawberry Fields, a tear-shaped, 2.5 acre plot dedicated to John Lennon.
The handsome mosaic is a reproduction (except for the "Imagine" inscription) of one uncovered in Pompeii, a gift of the city of Naples, Italy. A fellow has taken it on himself to arrange flowers in and around the mosaic every day since 1993.
All this combined with people gathered around the mosaic or sitting on the benches that encircle it make for a good photo opportunity.
 Why is it that when I take a picture of a tall building, it often looks distorted? Gee, those walls sure looked perpendicular to the ground and parallel to each other when I was standing there! But in the image I come home with, the walls are at all sorts of angles, and the building looks like it's falling over backwards.
 Start with the Image menu, and select Transformation, and then Skew. You'll see a dialog like this one. Just click the OK button.
 This will bring up the New Layer dialog. While it's good practice to name layers with a meaningful name, we'll be throwing this layer away soon anyway, so just click the OK button and continue to the next step. (Layers are a subject for a whole other post, or really several posts.)
 At this point, you'll see a thin box around the entire image. The box also has tiny circles at each of the corners and at the midpoint along each side. You can grab the box at any one of the circles (think of them as "handles") and tug or push your image.
 Here is the final photo, after I gave it my 30-second Photoshop 80-20 Rule treatment to color-correct and contrast-sharpen the image.
  Sandy and I spent a great two days in New York City this weekend, seeing Mama Mia! on Broadway and doing some sightseeing.
 You've heard of garage bands... well, this is a garage photo.
I took it this on a December evening in 2005 from the hi-rise garage where I'd been parking the previous few days. At that time, I was a contractor working at Constellation Energy in downtown Baltimore. Yes, sometimes it pays to be lazy...
I had been taking the Light Rail for the past two months and hoofing it the remaining three-quarters mile back and forth to CE's office, but if I had continued to do that, I wouldn't have seen this spectacular view from the southeast corner of the garage.
I had been treated to this scene on each of the previous few nights leaving the garage, getting a glimpse of the tent-like, sail-like roof on each floor as I spiraled towards the exit. Finally, I couldn't stand it any longer - today I brought the camera and tripod along for the trip.
At 4:45, sunset that early winter day in Baltimore, I left the office to head up to the 3rd floor of the garage, knowing that the best lighting would be arriving soon - the sky dark but not yet black, and the fabric roof lighted from the inside. I set up the tripod, framed my shot, and kept shooting every minute or so, bracketing along the way. This image, which I think was among the best of the lot, was from about one-half hour after sunset.
In the excitement and concentration of the moment, I had neglected to put on my gloves. The 30-degree weather did a job on my fingers, but I didn't really notice until I packed up my gear to head back to the office. Well, it was worth it.
By the way, what we're looking at here is the front of the Columbus Center, which is now the home of University of Maryland Biotechnology Institute. The huge tensioned-fabric roof is the most outstanding feature of the building.
 I get to go to work every day in this handsome 1930's building at 111 Market Place.
When I bought my Canon Digital Rebel almost five years ago, it came with a "kit lens", an 18-55 mm zoom. That's roughly equivalent to a 28-90 mm zoom on a 35 mm camera - moderate wide-angle to short telephoto.
The Digital Rebel was the first DSLR under $1000 ($999.95, to be exact, when I bought mine at Best Buy,) but now there's lots of competition at even lower price points, and most of these come with an 18-55 mm zoom (or it's four-thirds equivalent.) Nowadays, a zoom in this range is cheap to make, and besides, pretty handy. The wide end of the range is wide enough to be useful, and the telephoto end is great for portraits.
But the long end just isn't long enough for me. So when I take out my DSLR (now a 4th-generation Digital Rebel XSi,) I also schlep along a 70-300 zoom. And it usually turns out that whenever I change lenses, I see a shot that needs the lens I just put in my bag.
What I really want now is a walk-around-all-day lens like the Sigma AF 18-200mm DC OS . Now that's the 35mm equivalent of a 28-320 mm zoom, and with that kind of range in one lens, I could probably leave my other lenses, and the whole camera bag, for that matter, home. So that's what I'm saving my DSLR pennies for now.
But who wants to carry a DSLR around every day, even with a light and compact zoom like the Sigma? That's why I have my take-along-everywhere-everyday camera, a Canon A620 that I bought in early 2006. The current model in Canon's lineup sells for about $175-200, and it's a good everyday digicam. You can't carry it in your shirt pocket, but it will easily fit in most pants pockets or even a small purse. Me, I just through mine in my take-to-work backpack along with my lunch and a book to read on the Light Rail.
Now what I really want in an everyday digicam is something with the lens range of that Sigma 18-200mm lens. As I said, it would be the 35 mm equivalent of a 28-320mm zoom. But while you can get digicams with 10X or more zoom ratios, they all start at a 35mm or 37mm equivalent, and that's just too narrow for my wide tastes.
So here's what my specs are for my next digicam:
Now is that too much to ask?!
The closest thing I've seen so far is the new Canon Powershot SX110 IS - the lens is equivalent to 35-360mm, more than enough on the long end but not nearly wide enough on the other side. Discounted to around $275, it's a very attractive package, but I'm not buying another digicam with such a "normal" wide angle end of the zoom range. I want wide, baby, wide!
Anyone at Canon listening?


 I opened my front door one night and there she was, already having spun a pictorially perfect composition - must have known a photographer lived there.
 Woke up, jumped out of bed... and noticed that it was a very foggy morning. The first thing that went through my mind is, "Be careful driving to work!"

To be honest, most of my pictures suck. The saving grace of that admission is that most of your pictures suck, too. How could I possibly know such a thing? Because most of everybody's pictures suck, that's how. I've seen Cartier-Bresson's contact sheets, and most of his pictures sucked. One of my teachers said that it was an epiphany for him when he took a class from Garry Winogrand and learned that most of Winogrand's exposures sucked. It's the way it is.See the entire article, entitled The Magic Bullet, here.


 During the school year, I became good friends with my classmate Rich Schnabolk, who was a more advanced photographer than me. Rich actually had an SLR, albeit a Kowa SE, which I used to rib him about. Nevertheless, I wasn't too proud to use the Kowa and Rich was a good enough sport to lend it to me from time to time. And from humble beginnings... that Kowa made me lust after a "real" camera, that is, an SLR.
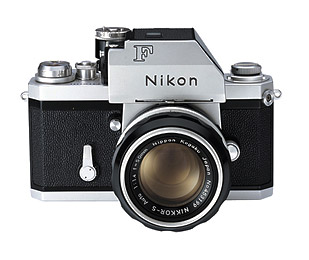 Back at college, I was a yearbook photographer, then photography editor in my junior year. We had bought a Yashica Mat 124 TLR that year, and digging around I found an old Crown Graphic 4x5 press camera that hadn't been used in years. I took both of them home with me during the summer, and I made good use of the TLR as a dog photographer (or, as Mom used to call me, Photographer to the Dogs.