Showing posts with label New York. Show all posts

Tuesday, March 29, 2011

Flatiron Detail

Another of my favorite buildings, the 1902 Flatiron Building (Fuller Building.)

Built to take advantage of the triangular lot formed by Fifth Avenue, Broadway, and East 22nd Street, H.G. Wells proclaimed when he first saw it:

"I found myself agape, admiring a sky-scraper the prow of the Flat-iron Building, to be particular, ploughing up through the traffic of Broadway and Fifth Avenue in the afternoon light."

Please see a schedule of some of my photo tours of NYC for Washington Photo Safari here.

Friday, March 25, 2011

Chrysler Building Details

Chrysler Building Radiator Cap Gargoyle Racing Cars
The Chrysler Building at Lexington and 42nd St is the iconic Art Deco skyscraper, and my own favorite. This view shows off the stainless steel "gargoyles" at the 31st floor level. They're modeled after the radiator cap of the 1929 Chrysler. You can also see the mosaic cars that race all around the 31st floor.

The Chrysler Building is one of the many great photo-worthy sites we'll visit during my Photo Safari to NYC next Saturday, April 2, 2011. Photo instruction, including composition and how to get the most out of your camera is all included!

Register here

Wednesday, March 16, 2011

NYC Artist Makes It Big

Talk about making it big!

I was walking to the Lexington Avenue subway station on E. 23rd Street when I looked up and saw this giant work-in-progress. There were actually four men working on this - two each on two platforms.

I had my Tamron "super-zoom" 18-270mm lens on my camera. I racked it to full-out telephoto and started to watch the painters. The 270mm position was just enough to show a small but detailed figure against a large section of the painting.

From a superb workshop I took with Karen Schulman, I knew that in an image like this, gesture is important to keep the photo from looking too static. "Gesture," in that context, could mean a lean of the body, an arm or leg extended, in other words, just about anything that departs from "just standing there."

For this situation, I figured that "gesture" would be in the form of reaching out with the paintbrush. It took about 20 minutes, but sure enough, I got a few shots of two of the guys in a good lean-and-stretch. This one is the one I liked best, as he's putting his whole body into it.

In case you're curious, the... er... I don't know what to call the painting-on-the-side-of-a-building... is for a remake of the 1981 film, Arthur.

Wednesday, May 12, 2010

Art Deco Heaven

In the foreground is the 1936 statue of Atlas by Lee Lawrie and Rene Chambellan. The Art Deco statue greets visitors to 630 Rockefeller Center (the International Building) as well as passers-by. Through the spherical astrolabe on Atlas' shoulders, you can see 30 Rockefeller Center.

"30 Rock", since 1988, is called the GE Building. Before that, it was the RCA Building. The renaming took place after GE bought RCA (and thus, NBC) 27 years ago.

Prior to 1988, "the GE Building" was the beautiful 1931 Art Deco skyscraper at 570 Lexington Avenue. Oddly enough, the building was designed for RCA, and the original plans refer to it as "RCA Building." As it was being finished, GE and RCA were involved in some anti-trust actions, and in the settlement, GE got the building.

I was privileged to work in the "old" GE Building at 570 Lexington for 8 years. There was a company dining room on the 50th floor where anyone, from Jack Welch to the newest mail boy, could eat for a few bucks. The view to the West from the mens' room on the 50th was spectacular, until the Leona "Queen of Mean" Helmsley built her execrable Helmsley Palace Hotel.

Monday, March 2, 2009

Liberty For Sale

Liberty for SaleIn most ways, it's a typical Times-Square area New York gift shop, full of I Love NYC ball caps, eight sizes of Empire State Building souvenir ornaments, and racks of Obama-Yes We Can! t-shirts.

But what distinguished this little shop was the just-about-person-sized replica of the Statue of Liberty, made from oak with a realistic copper patina and gold-leaf torch flame.

For sale!

At an appropriately recession-worthy price, too - I mean, wouldn't you like to have a Statue of Liberty in your home for only $1500?

By way of explanation, I took this photo yesterday on 8th Avenue near 45th Street waiting for our son Ben to join us for lunch. We were all going to see the matineƩ of the musical Avenue Q.

Camera-wise, I used a disappear-in-your-pocket Canon SD400 that I inherited from daughter Leah - she just replaced it with a spiffy Canon SD880IS.

Wednesday, October 29, 2008

I'm Only Sleeping

Please don't wake me, no
don't shake me
Leave me where I am
I'm only sleeping


That's exactly what came to mind as I saw this fellow sleeping, only a few feet from the Imagine mosaic, a memorial to John Lennon in Central Park.

Beatles fans will recognize those lines as the end of the first verse of I'm Only Sleeping, which is track 3 on the Revolver album.

It's a strange and wonderful Lennon composition, featuring beautifully oxymornic lyrics ("Close my eyse, float upstream...") and a transfixing backwards-guitar solo. If you're musically inclined, you'll find these notes by Alan W. Pollack interesting.

Tuesday, October 28, 2008

So Many Rosenbachs, So Little Time

Our cousins from Strasbourg visited New York City the week before last, which gave us all the opportunity to meet each other for the very first time. Sandy and I drove to NYC and spent a marvelous day with our wonderful cousins, Patrick and Muriel Rosenbach, and their daughter. That was three-fifths of the family, as sons Dan and Benjamin (yes, another Ben Rosenbach!) weren't able to join them on this trip.

Muriel made a picnic lunch which we ate in Central Park on the grass at Strawberry Fields, after which we went to Bethesda Terrace, walked through the Ramble, and saw Belvedere Castle and Shakespeare Garden.

With any luck, we'll be able to see them again in the not-to-distant future by traveling to Strasbourg.


My cousins Patrick and Muriel Rosenbach and daughter

Daughter and mother

Thursday, September 18, 2008

My Camera History, Part Deux

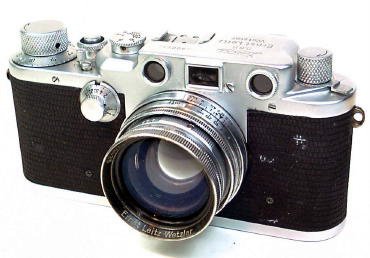
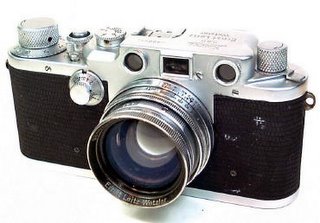
Leica IIIc
After college, I came back to Batimore, where I got my first engineering job, and where I lived for four years, until 1975.

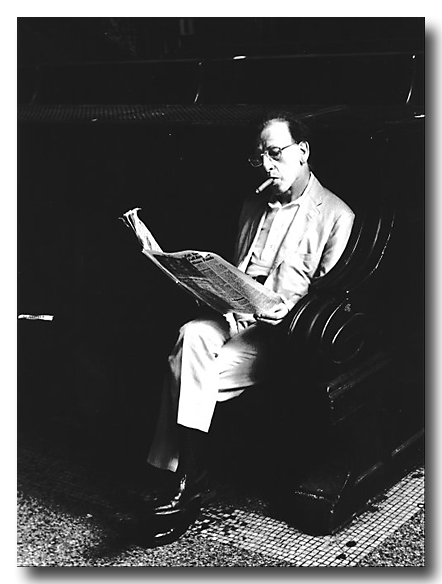
On a day trip to NYC in late summer of 1973, I bought a Leica IIIc at Olden's, along with a Canon Seranar 50mm f/1.8 lens. With 2 or 3 rolls of Plus-X in my pocket, I was suddenly a Leica photographer, in the company of Cartier-Bresson and Eisenstadt. I had parked the car in Hoboken, and after returning there, I sneaked a shot of this gentleman reading his Daily News in the Erie-Lackawanna terminal.
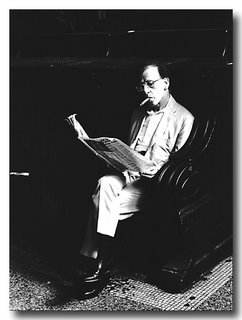
Man on Bench, Erie-Lackawanna Terminal, Hoboken 1973That Leica, when I bought it, was already 33 years old, but it was a thing of beauty. Compared to my Nikon, especially with its heavy and clunky Photomic T finder, it was a featherweight, and a pleasure to carry around. For some reason, compared to an SLR, the rangefinder mechanism and all the fine knurling on the various knobs gave it a feeling of watch-like precision. It may be a guy thing, but I found myself often picking it up at odd times and playing with it - not shooting pictures, just looking through the viewfinder and rangefinder (two separate windows in the old screw-mount Leicas!) and focusing it, and dry-firing it.

L'homme sur Banc, bis - Central Park, NYC 1974The Serenar was a really excellent lens, but I had really wanted a Leica lens so as to be more "authentic." A year after buying the camera, I purchased a near-mint collapsible Summicron 50mm f/2.0. I wasn't disappointed, as this turned out the be the best lens I've ever owned prior to the digital age. Besides its amazing optical performance, it was also a better physical match for the small camera than the heavy Serenar. With the Summicron collapsed, I could slip the whole package into a coat pocket.

Here's another "Man on Bench" shot, taken in New York's Central Park, September 1974, with the Summicron. I was living in pre-Urban Redevelopment downtown Baltimore at the time, which seemed pretty boring to me, so I tried to get up to New York City a few times a year for picture opportunities.
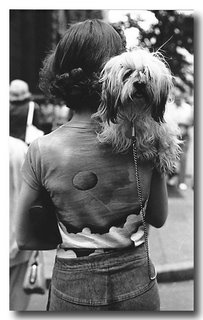
Dog on Shoulder, Madison Avenue 1974And here's one to show that I'm not afraid to get right up close to a subject and look him in the face! Check out the classic mid-'70's painted t-shirt and slightly pre-disco hairdo. This shot taken on Madison Ave in NYC, August 1974.

Like these photos here, most of what I took with the Leica was black & white. After Roger's thorough training and several years of experience developing and printing B&W during college, I wouldn't let anyone else develop or print my negatives. During those first post-college years, my darkroom was a tiny hallway between the bathroom, bedroom, and living room in my one-bedroom apartment. There was a door to each room, so I just closed the ones to the bedroom and living room, set up a table in the hallway for my enlarger and trays, stuffed towels under the closed doors to block out stray light, and I was in business.

Just one more Leica photo for now, this one from the time after I had moved to Manhattan to work for GE....

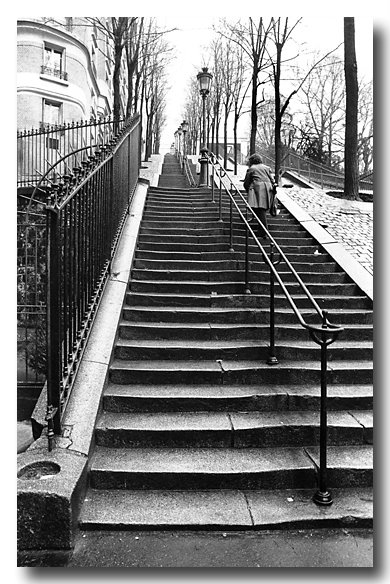
Montmartre Steps - Rue Foyatier, Paris 1977Rue Foyatier, this oft-photographed stairs, climbs up the Butte Montmartre in Paris, ending near Sacre Couer basillica, the highest point in the city. It was a soggy, overcast day, and I wanted a somber, lonely look. I waited with my Leica IIIc and this solitary lady obliged me by starting the long climb upward. December 23, 1977.

Strangely, when I did a search on Google Images for "Rue Foyatier" back in early 2006, of all the Rue Foyateir photos in cyberspace, this was the first one!

But for some reason, doing the same search today yields no sign of my 1977 photo.
I guess that was my 15 Minutes of Fame.

Tuesday, September 16, 2008

Tech Tuesday: Architectural Restoration

Why is it that when I take a picture of a tall building, it often looks distorted? Gee, those walls sure looked perpendicular to the ground and parallel to each other when I was standing there! But in the image I come home with, the walls are at all sorts of angles, and the building looks like it's falling over backwards.

Take, for example, the photo here of 160 W. 73rd Street, a lovely Art Deco co-op typical of many of the elegant older apartment buildings on the Upper West Side of Manhattan.

I framed the image carefully in my viewfinder, trying to line up the setback on the right edge so that it looked veritcal. Here's what the image looked like right out of my camear in Photoshop Elements 4. Notice how the left side of the building "leans" like a rickety shore shack, rather than the quite solid limestone-and-brick edifice it really is.

So why does this happen? I'll tell you why. When you point the camera straight at a building, the film plane (or for a digital camera, the plane of the sensor) is parallel to the building. This is great, because parallel lines in the building will come out parallel in the photo, and there will be no distortion.

The problem is, if I did that with my photo of 160 W 73rd Street, I would have gotten a lovely picture of the lobby and the awning. Not quite what I wanted. So of course, I tilted my camera upward to include the top of the building.

But now, the film/sensor plane is no longer parallel to the building, and I get perspective projection distortion. How do I correct this? In the realm of 35mm and DSLRs, there are special, usually expensive perspective control lenses that allow you to tilt and shift the lens relative to the film/sensor plane. Here's a good, well-illustrated article by Ken Rockwell that explains this very well.

View cameras (the kind where the photographer focuses on a screen under a dark cloth) usually have camera movements to control perspective distortion and other problems. But we can accomplish our goal of un-distorting our tall buildings using some simple tricks in even the older versions of Photoshop and Photoshop Elements.

Start with the Image menu, and select Transformation, and then Skew. You'll see a dialog like this one. Just click the OK button.


This will bring up the New Layer dialog. While it's good practice to name layers with a meaningful name, we'll be throwing this layer away soon anyway, so just click the OK button and continue to the next step. (Layers are a subject for a whole other post, or really several posts.)

At this point, you'll see a thin box around the entire image. The box also has tiny circles at each of the corners and at the midpoint along each side. You can grab the box at any one of the circles (think of them as "handles") and tug or push your image.

You can see here how I tugged the top left corner of my photo to "un-tilt" the building. I used my calibrated eyeballs to tell me just how much to tug.

There will be times when you'll take a photo of a tall building straight-on, but still tilted up. In that case, both sides of the building may appear to fall away. So can you do this same maneuver with the other side? Sure! As I said, you can push or pull any of the "handles" until your photo looks right to you.

Here is the final photo, after I gave it my 30-second Photoshop 80-20 Rule treatment to color-correct and contrast-sharpen the image.

By the way, in the latest versions of Photoshop, there are other, sometimes easier or better ways to do perspective distortion correction. But if you're like me, you just don't have the big bucks to buy Photoshop CS3. That's why I'm showing these techniques that you can do even with just an old copy of Photoshop Elements 2 (if you search carefully online, you should be able to by a perfectly good, perfectly legal OEM copy of PSE 2 for about twenty bucks.)

Monday, September 15, 2008

Governors Island

Governors Island FerrySandy and I spent a great two days in New York City this weekend, seeing Mama Mia! on Broadway and doing some sightseeing.

I'll have many more photos and, of course, lots to gab about, when I have some more time later this week.

But meanwhile, if you're visiting New York on a Friday, Saturday, or Sunday between now and October 12th, be sure to consider a trip to Governors Island, a former military reservation just off the tip of lower Manhattan that's now a great venue for picknicking and sightseeing.

Tuesday, September 2, 2008

Tech Tuesday: Better B&W From Digital

Loeb Boathouse - Just Removed the ColorOK, I'll let you in on a secret - much of what I've learned about Photoshop Elements is from Scott Kelby's excellent books - I think he's written one for each version so far - I'm a little behind the times right now, so I'm still using The Photoshop Elements 4 Book for Digital Photographers.

One of the things I know very little about is how to get a decent B&W image from a color digital photo... but yep, Scott goes into that, too.

Loeb Boathouse - Better B&W using Scott Kelby's technique
Here's the general outline to how he says to do it:

  • Open the color image in Photoshop Elements.

  • Make sure the foreground color is Black and the background color is White (or as Scott says, just press the "D" key - this will set your foreground and background colors exactly this way.)

  • Go to the Layers palette and choose Levels from the Create Adjustment Layer drop-down menu (it's the half-black, half-white circle icon.) Once the Levels dialog comes up, just click OK.

  • Now again, from the Layers palette, chose Gradient Map from the drop-down menu and just click OK on the Gradient Map dialog. This will give you a B&W image, and you should notice that it already looks better than just using the standard commands to create a grayscale image (Image/Mode/Grayscale, or Enhance/Adjust Color/Remove Color.)

  • Here's where you can tweak the B&W tones a bit. First, in the Layers palette, double-click right on the Levels thumbnail to bring up the Levels dialog. Select Red from the Channel drop-down list, and then play a bit with the black-point slider to the right to increase shadows until you see what you like.

  • Without clicking OK, select Green from the Channel drop-down list, and this time try dragging the white point slider to the left to increase highlights.

  • Again, don't click OK yet - now pick Blue from the Channel drop-down list and try playing with the highlights (quite a bit) and the shadows (just a little.)

  • You can go back and forth between the 3 channels, tweaking away - just stop when you're happy with the look, then finally click OK in the Levels dialog.

At this point, mush the layers you created into one layer with the Layers/Flatten menu. The file still has color information in it - if you want to save file space, you can turn it into a grayscale file with Image/Mode/Grayscale.

For this photo, once I got to this point, I applied local contrast sharpening as I usually do (see this post for how to do that) and then final sharpening. You can see the results in the second image - compare that one to the standard remove-the-color version at top. To paraphrase those laundry soap commercials - whiter whites, blacker blacks, and just nicer overall tonality.

Amazingly, I even got an excellent B&W print of this second image on my 3-1/2-year-old Canon i850 printer. I would have expected some tinting, at least in some areas of the photo, but this print looks like an old-fashioned paper-and-developer B&W print (I doubt that this will work out so well for every image - normally you need an inkjet printer that's designed to do B&W, such as some of the higher-end Epsons.)

If you use Photoshop or Photoshop Elements, check out Scott Kelby's books - he packs them with excellent practical how-to advice.